Change screen
Swipe left or right. A short press of the rear button also moves to the next screen.
Simple step-by-step help
You do not need to understand Bluetooth or electronics. Follow the first setup once, then ChargeScreen works by itself.
Do this once
Allow about five minutes. Keep ChargeScreen powered throughout.
Use its USB‑C socket. If you bought the optional rear power cable, line up the notch on the cable with the gap in the plug before connecting it.
Rear cable: after power is applied, you may need to press the recessed side button with a small blunt tool to start the display.
Tap the three dots at the bottom of the round screen.
Tap the row marked WiFi. It should change to On.
Shortcut: hold the rear button for two seconds to turn setup Wi‑Fi on or off. Never hold that button while switching the power on.
Open Wi‑Fi settings on your phone and join the network named ChargeScreen.
Your phone may open it automatically. If it does not, open your normal web browser and enter:
This address works only while your phone is connected to the ChargeScreen network.
Find Build Your Setup. Press the green + beside each device fitted to your vehicle. Add only devices you actually have.
If you have two of the same type, press + again. You can add up to four of each supported device.
Every Victron device needs its own Instant Readout key. Non‑Victron batteries and Mopeka sensors are normally found automatically.
Show me how to find a Victron keyPress Save Settings. Wait a few seconds, then swipe sideways on the round display. You should see only the screens you added.
Victron equipment only
This is not the PIN printed on the Victron device.
VictronConnect wording can vary slightly by app version and product.
Open the VictronConnect manualOnce setup is finished
Swipe left or right. A short press of the rear button also moves to the next screen.
Tap the three dots at the bottom of any normal screen.
Touch once and release. Then touch again if you want to press a control.
The round screen
Swipe sideways while Settings is open to move through its four pages.
What am I looking at?
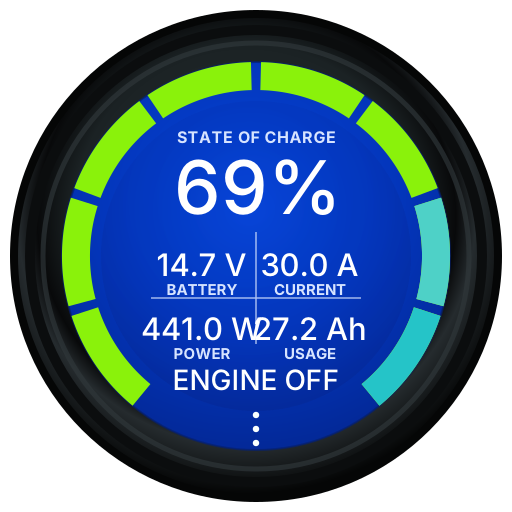
Roughly how full the battery is.
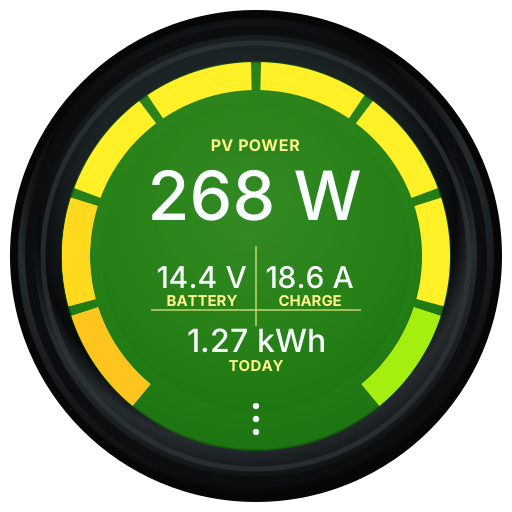
The electrical pressure of the battery or device.
How much current is flowing. On battery screens, positive is charging and negative is discharging.
How much power is being produced or used.
Battery capacity used or remaining, depending on the connected device.
Energy produced, commonly the solar yield for today.
| Screen | What it shows | Key needed? |
|---|---|---|
| SmartShunt / BMV | Battery percentage, voltage, current, power and amp-hours | Yes |
| SmartSolar MPPT | Solar power, battery voltage/current, daily yield and charger state | Yes |
| Phoenix Inverter | VA, battery voltage, AC output, state and alarms | Yes |
| Blue Smart mains charger | Charge rate, voltage, current, state and errors | Yes |
| Orion DC‑DC | Input/output voltage, charge current, power and state | Yes |
| BatteryProtect | Input/output voltage, output state, warnings and alarms | Yes |
| Lynx Smart BMS | Battery percentage, voltage, current, power and alarms | Yes |
| DC Energy Meter | Voltage, current, power and energy totals | Yes |
| Smart Battery Sense | Battery voltage, temperature and alarms | Yes |
| Eco-Worthy, Fogstar, Roamer, ABC-BMS, Daly or Renogy battery | Battery percentage, voltage, current, power and capacity | Normally no |
| Mopeka / Lippert sensor | Tank depth, percentage or litres remaining | No |
Start here if something is wrong
The selected Victron screen has no Instant Readout key. Open the setup page, find that exact Victron device, paste its key, and press Save Settings.
ChargeScreen can hear the device but cannot read the message. For Victron, the usual cause is the wrong Instant Readout key. Copy the key again from the correct device.
Demo mode is on. Open Settings, tap Demo mode so it shows a dash instead of On, then return to the setup page and add only your own equipment.
Touch once and release—the screen may simply be asleep. If it stays black, check the power connection. With the optional rear cable, press the recessed side button after power is applied.
ChargeScreen has received a warning or error from supported Victron equipment. Read the reason at the bottom and check the original equipment. The alert clears when the connected device reports that the problem has cleared.
Important: ChargeScreen alarm support is still being tested. Never use it as your only safety or alarm system.
Occasional maintenance
Only install the latest Beta firmware made for ChargeScreen’s ESP32‑C3 hardware.
Advanced and optional
You do not need this if your equipment is working.
BLE Capture records nearby Bluetooth messages so an unsupported device can be investigated.
The file includes Bluetooth broadcasts from nearby devices such as watches, phones, TVs, batteries and sensors. Most of this data is encrypted, but it will still appear in the file.
Still stuck?
Include a photo of the ChargeScreen message, your equipment brand and exact model, and the firmware version if you know it.